25+ Easy Pumpkin Carving Ideas for Beginners
Pumpkin carving is one of the most beloved traditions of the fall season. It’s a chance to get creative, celebrate Halloween, and transform ordinary pumpkins into eye-catching decorations.
Whether you’re carving with kids, planning a pumpkin-themed party, or simply adding festive flair to your front porch, there are endless ways to bring your pumpkin carving ideas to life.
This guide will walk you through a wide variety of pumpkin carving ideas ranging from beginner-friendly designs to advanced, intricate creations. You’ll also find tips, techniques, and inspiration for making your pumpkins the stars of your Halloween decor.
Tips for Successful Pumpkin Carving
Before you start carving, it’s essential to set yourself up for success. With the right tools, prep work, and a few simple tricks, you can create a pumpkin that’s both impressive and long-lasting.
Choosing the Right Pumpkin (Size, Shape & Texture)
Selecting the right pumpkin is key to a smooth carving process.
- Look for pumpkins with a flat bottom so they won’t roll or tip over.
- Choose a pumpkin with smooth, even skin. This makes it easier to carve and helps designs look cleaner.
- For detailed designs, opt for larger pumpkins with thinner walls that are easier to cut through.
- If you want a classic jack-o’-lantern, round or oval pumpkins work perfectly.
Tip: Avoid pumpkins with soft spots, cracks, or bruising, as they won’t last as long.
Essential Tools for Pumpkin Carving
Having the right tools makes carving safer and easier.
- Pumpkin carving kits are great for beginners. They often include scoops, saws, pokers, and detailing tools.
- A serrated knife works well for cutting through thick pumpkin walls.
- Use melon ballers or ice cream scoops to efficiently remove seeds and flesh.
- For advanced designs, try linoleum cutters, clay sculpting tools, or even electric drills for precision.
Tip: Always use tools designed for pumpkin carving to minimize the risk of injury.
How to Prep & Clean Pumpkins Before Carving
Proper prep makes carving smoother and helps your pumpkin last longer.
- Cut off the top or bottom (whichever you prefer for design).
- Scoop out all seeds and stringy bits using a sturdy scoop or spoon.
- Scrape the inner walls to about a 1-inch thickness. This makes carving easier and prevents rotting.
- Wipe the outer surface clean to remove dirt or oils.
25+ Easy Pumpkin Carving Ideas for Beginners
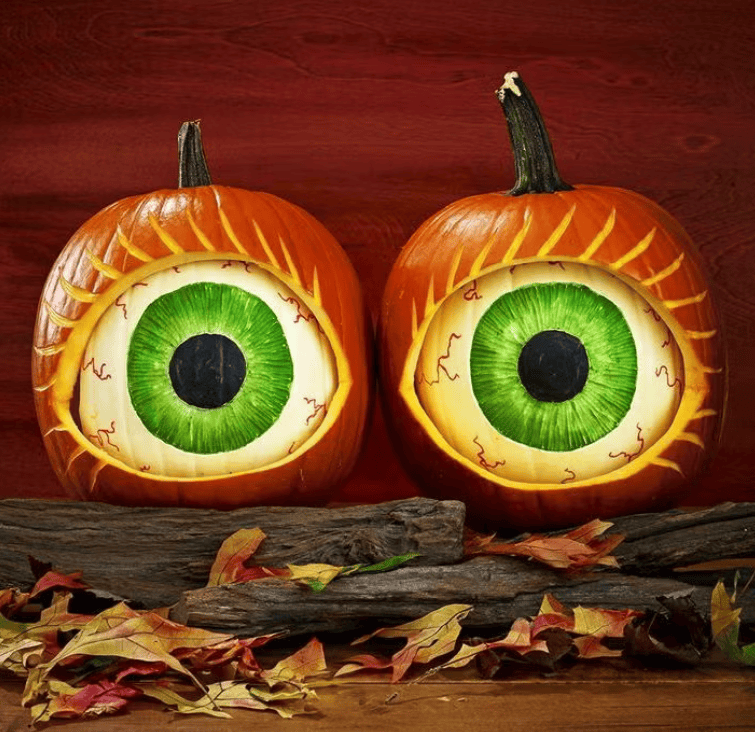
1. Eye see you pumpkins
These eerie “all‑seeing” pumpkins take jack-o’-lanterns to the next level. The layered gourds create a dramatic 3D eyeball effect that watches over your porch. Ideal for Beetlejuice-style Halloween décor, this project is surprisingly easy and visually striking, perfect for making a bold, spooky impact in just a few steps.
2. Decorative Owl Pumpkin
Transform a standard pumpkin into a wise owl using felt, cardstock, and simple accessories. This whimsical design adds a friendly, woodland vibe to fall décor. Quite easy to assemble, it’s a charming and kid-friendly Halloween project that brings personality and a cozy, rustic look to any Halloween or autumn display.
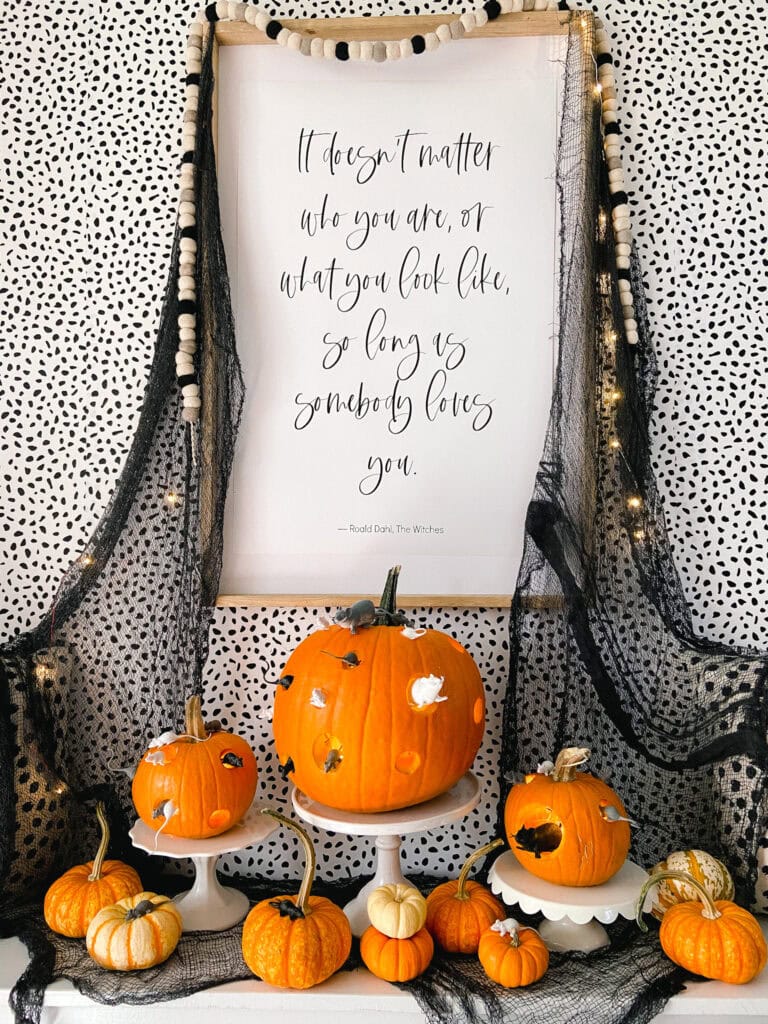
3. DIY The Witches’ Mice Pumpkins
Create a trio of witchy pumpkins with this easy printable. Print and cut out witch hats and facial features, then affix them to small pumpkins using tape or glue. Each pumpkin gets its distinct personality, from wicked grins to whimsical smiles. Grouped, they make a fun Halloween vignette. This project offers instant Halloween charm with a touch of crafty flair, and printables save time on drawing!
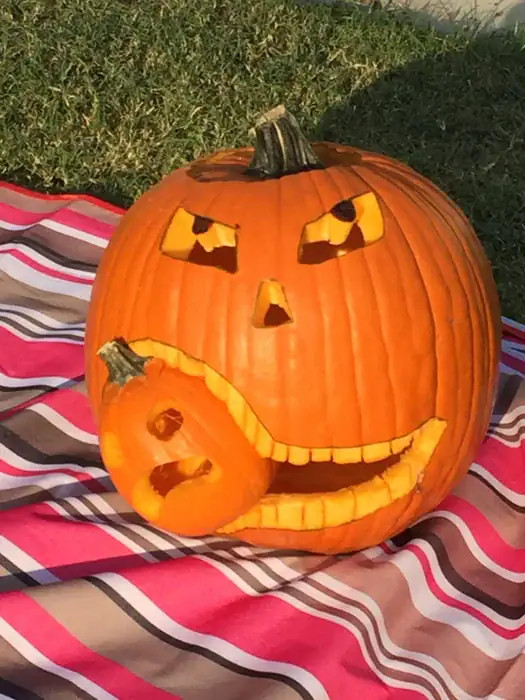
4. Pumpkin Eating Another Pumpkin
Go meta with a playful, twisted pumpkin design where one pumpkin “eats” another. Carve a large gourd with a mouth shape large enough to fit a smaller pumpkin. Hollow both pumpkins, nest the smaller inside, and carve expressive details like teeth or eyes on both gourds. The result is a humorous, slightly creepy scene that’s sure to be a conversation starter.
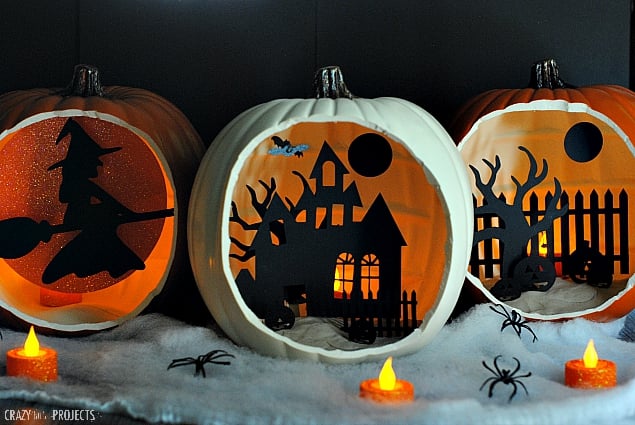
5. DIY Shadow Box Pumpkins
Create illuminated pumpkin art with this shadow box design. Cut a silhouette-style Halloween shape like a witch or cat into cardstock, layer it inside a real or foam pumpkin, and backlight it using LED tea-lights or battery-powered fairy lights. Then, place the carved “shadow” pumpkin inside a shadow box frame or display it on a shelf. The result is a glowing, 3D pumpkin silhouette that looks elegantly spooky in dim light. It’s an easy, visually striking alternative to carving that brings artistic flair and ambiance to any Halloween setting.
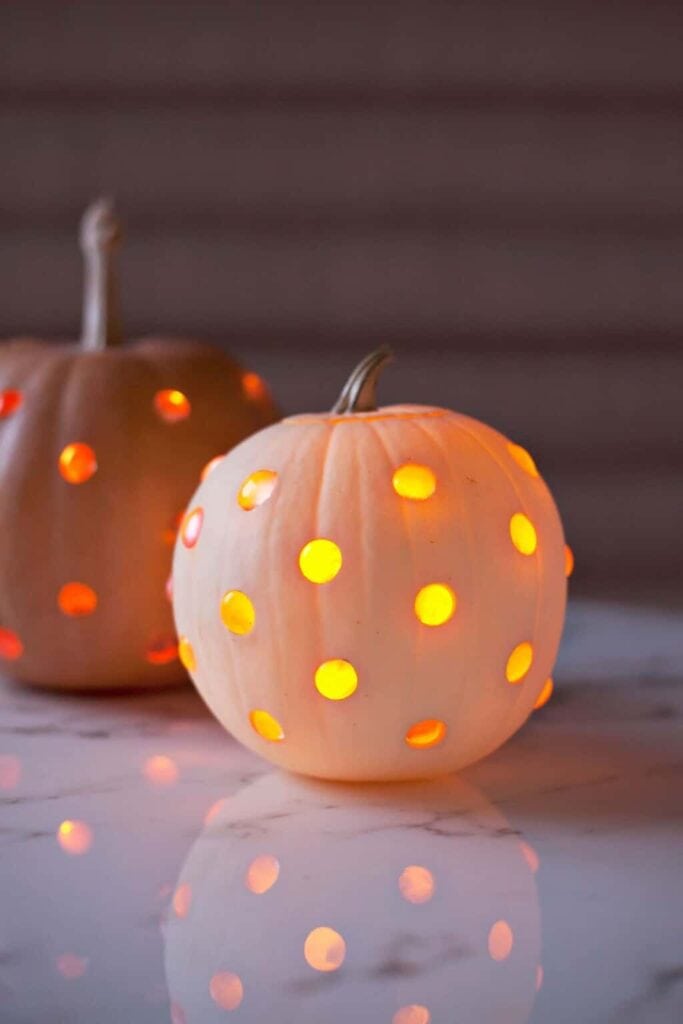
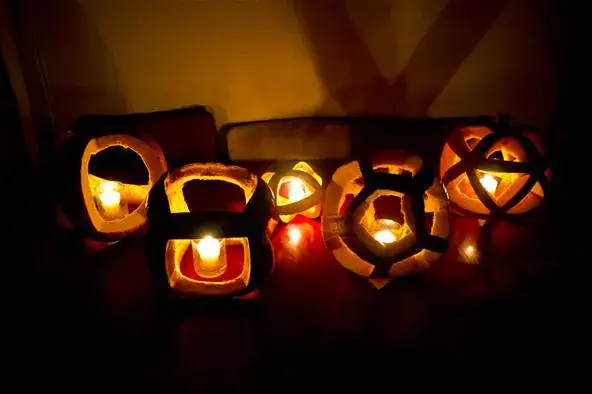
6. Glass Bead Jack-O-Lanterns
Transform your pumpkin into a glowing masterpiece with this idea. After carving jack‑o‑lantern holes, fill them with glass gems or beads for a radiant mosaic effect. Place an LED tea‑light inside to let the colored beads shine like stained glass. The result is a cozy, elegant lantern that glows warmly at night. This creative take adds sophistication to standard pumpkin décor. Plus, because it uses LED lighting and gems, it’s safe, reusable, and mess‑free: perfect for adding sparkle to your fall decor without extra carving.
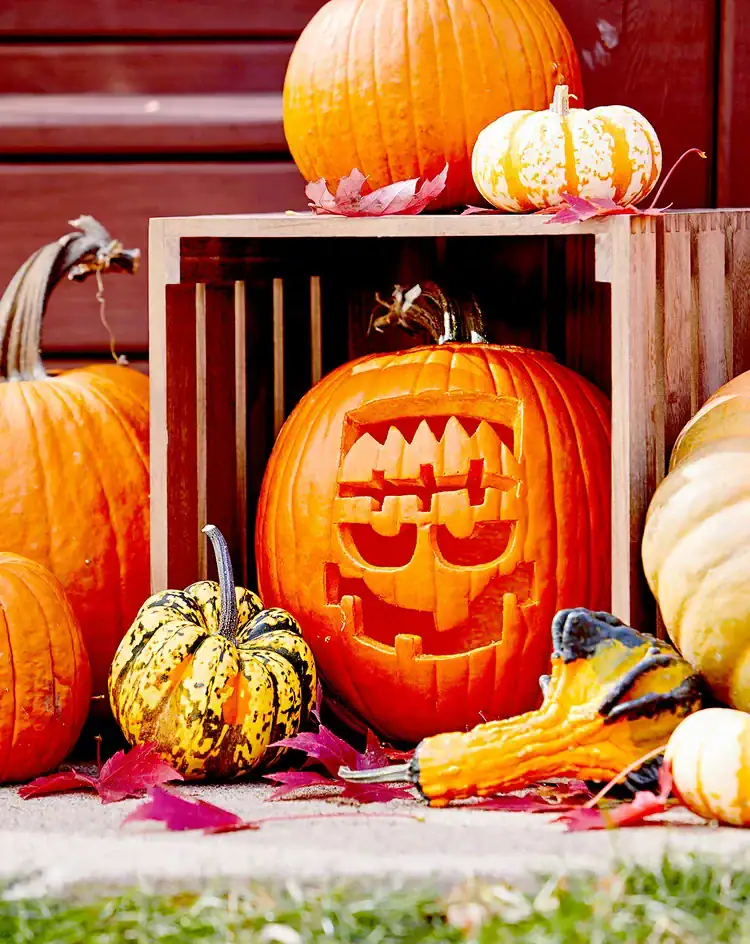
7. Frankenstein Halloween Pumpkin
This fun, family‑friendly pumpkin uses a free Frankenstein stencil to carve a goofy monster face. It’s a foolproof design for beginners: tape the stencil onto a 12‑inch pumpkin, poke pinholes, then carve along the outline with a serrated knife. The result is a charmingly spooky visage with a squared forehead, stitched mouth, and bold grin. Light it with a battery‐powered tea light candle to complete the look.
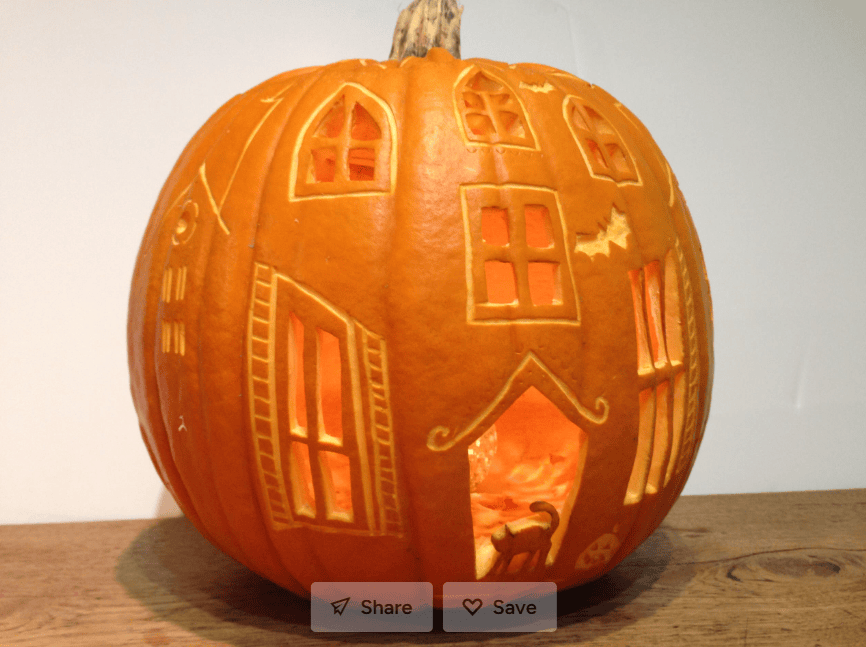
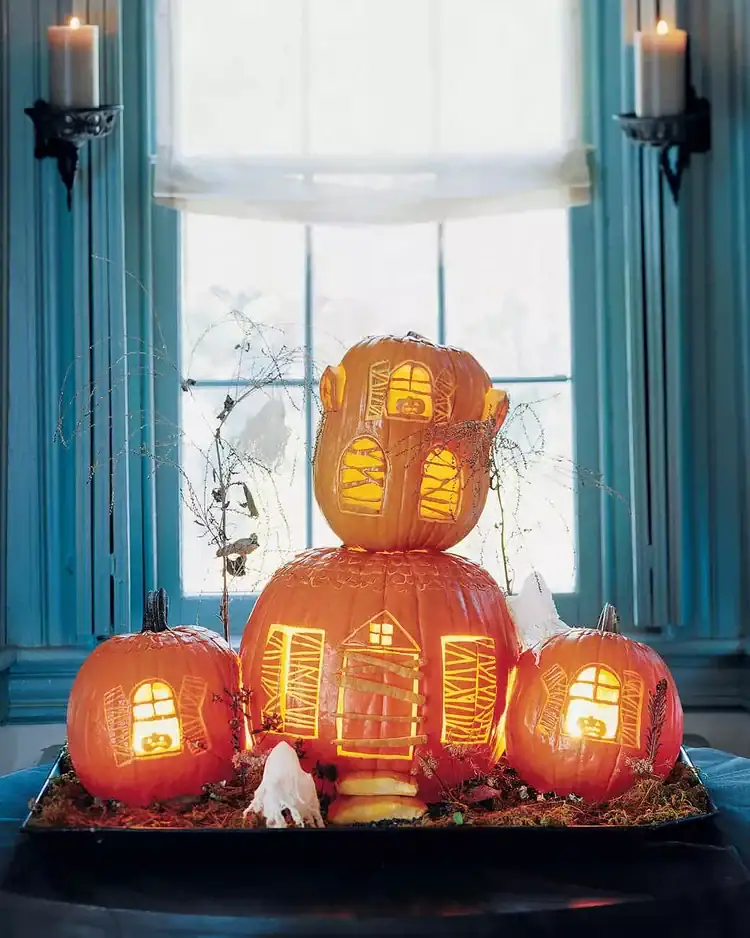
8. Haunted House Pumpkin
Carve architectural style into your pumpkin by creating a haunted house scene with windows, turrets, and eerie details. While an advanced project, the dramatic result is a miniature haunted mansion glowing on your porch. Perfect for Halloween enthusiasts looking to elevate classic pumpkin décor with a spooky storytelling twist.

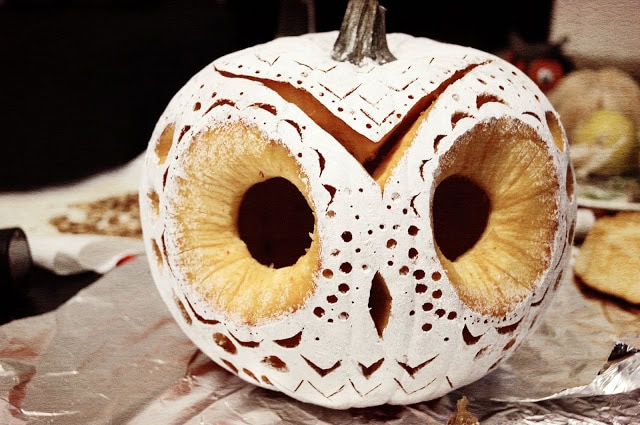
9. How to Carve a Pumpkin Owl
Turn your pumpkin into a wise woodland friend with this owl carving project. Use a stout kitchen knife to cut out round eyes and a curved beak, then layer in owl “ears” or feather etching around the face. Some versions use miniature pumpkins for eyes or to form the owl’s body. The process is mid-level in skill but very rewarding. The result is a charming owl lantern with a mystical vibe, perfect for porch decorations and woodland-themed Halloween setups.
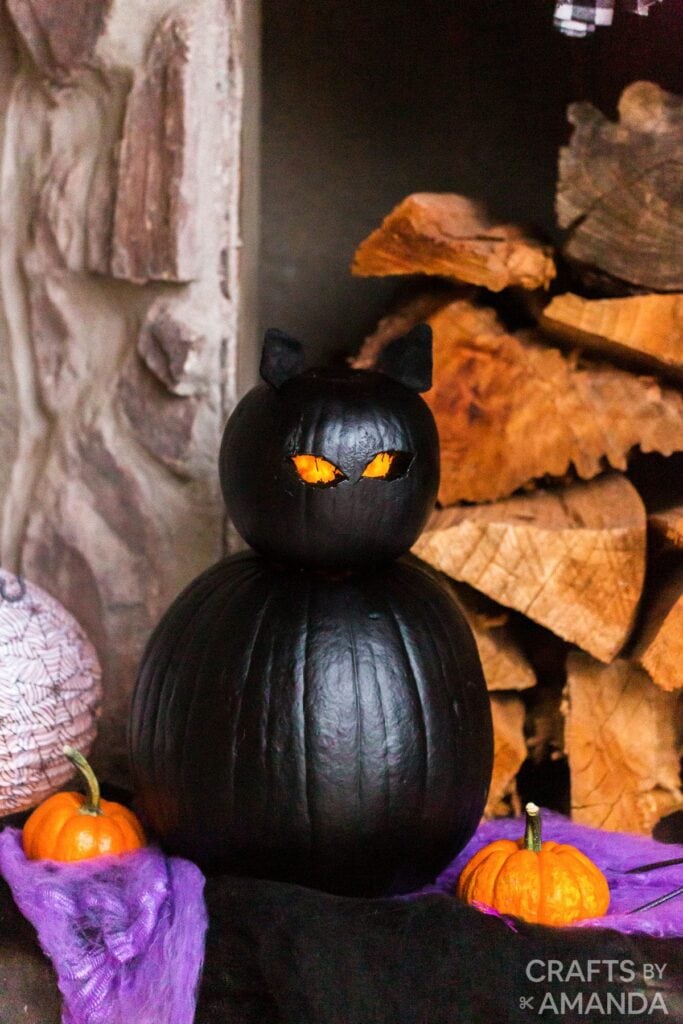
10. Black Cat Pumpkins
Create sleek, no-carve black cat pumpkins using a pair of stacked gourds spray‑painted matte black. Carve almond-shaped eyes on the smaller pumpkin, then add glowing LED lights inside for an eerie effect. Attach triangular felt or foam ears between the gourds using toothpicks or skewers. These pumpkins are quick to assemble, kid-friendly, and reusable each year. The whimsical black cat design is perfect for cat lovers and Halloween stylists, offering elegant yet spooky porch décor without the mess of carving.

11. Small Pumpkin Jack O’Lantern
This creative carving transforms a large pumpkin into a monster gobbling a smaller “victim.” The trick is carving a mouth big enough to hold the mini pumpkin securely. Start by sketching a wide grin with fang-shaped teeth, hollow both pumpkins, and nest the smaller gourd inside. It’s a simple yet impressive design that gives a high “wow” factor without complex techniques. Ideal for anyone wanting a playful, dramatic centerpiece, this two-pumpkin combo puts a humorous twist on traditional jack-o’-lanterns and is sure to make guests do a double-take.
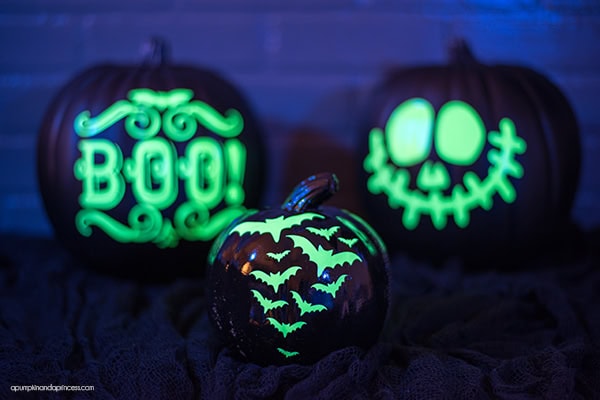
12. Glow-in-the-Dark Pumpkins
Add a ghostly glow to your porch with these no-carve, glow-in-the-dark pumpkins. Hollow real or faux pumpkins, carve or paint faces, then apply glow-in-the-dark paint or sealer over specific features: eyes, mouth, outlines. Charge them under daylight or a porch light, and at night, they emit a soft, eerie luminescence without candles. These spooky pumpkins are safe, reusable, and easy to store: perfect for creating a haunting yet kid-safe Halloween ambiance.
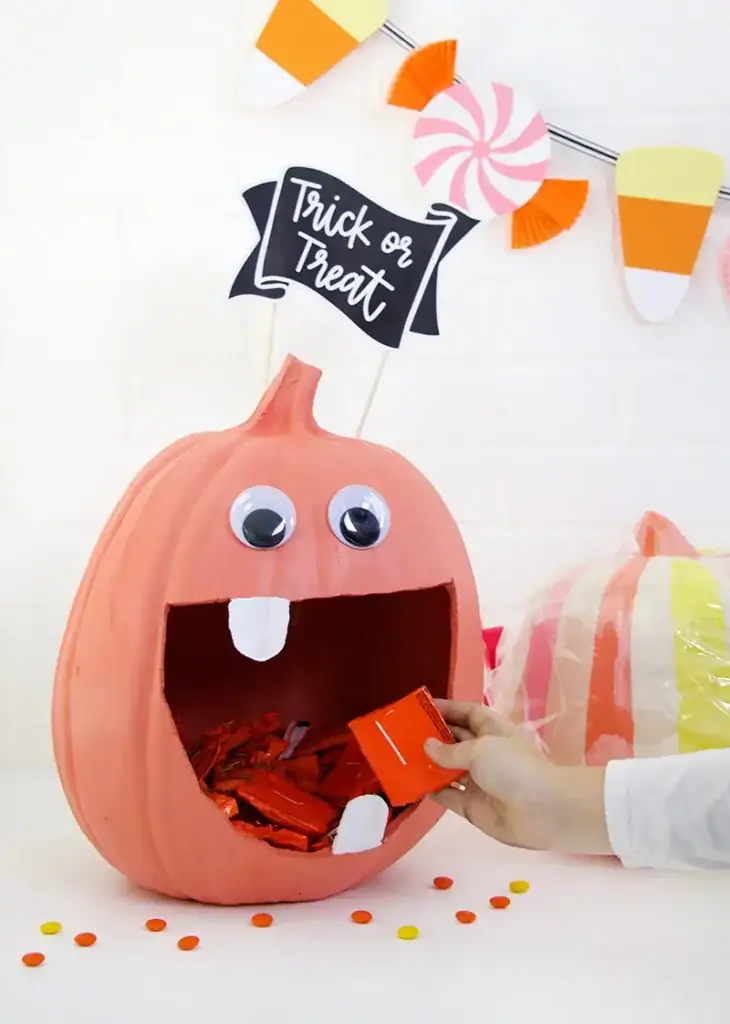
13. DIY Pumpkin Candy Bowl
Elevate your Halloween hosting with this adorable pumpkin candy bowl. Hollow out a small-to-medium pumpkin, then carve or decorate a friendly monster face for a whimsical candy holder. Pair it with a coordinating Halloween candy banner using cut files or printables for a festive tabletop display. This craft combines function and charm: perfect for parties or trick-or-treat stations. It’s approachable, fun to make, and completely safe since it uses no carving tools or open flames. Plus, it doubles as party decor and storage!
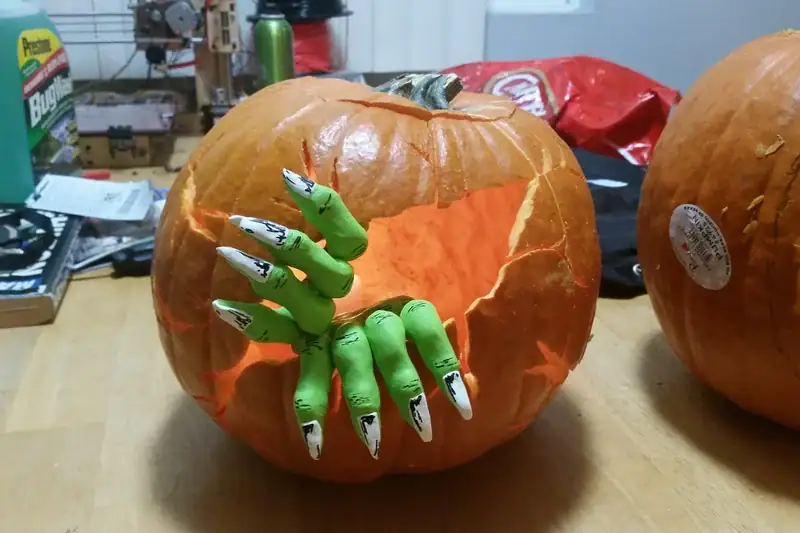
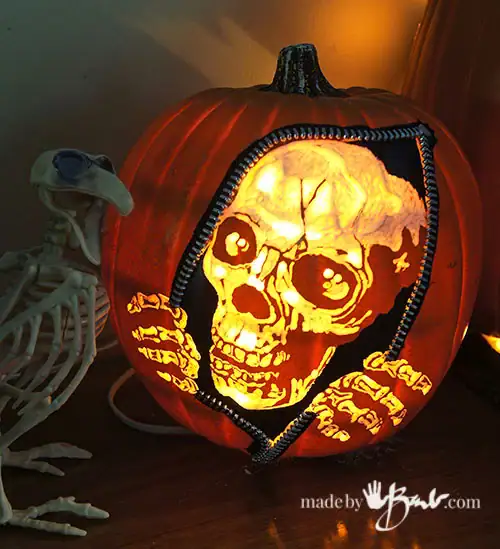
14. Creepy Hands Carved Pumpkin
This ghoulish pumpkin features realistic hands emerging from its head or side: perfect for a creepy-mansion vibe. Use lighting inside to cast eerie shadows through the gaps. The tactile effect makes it feel like the pumpkin is reaching out, creating a spooky 3D prop that’s sure to impress. It’s ideal for outdoor displays or haunted house setups.
15. How to Carve a Pumpkin Like a Pro
This pumpkin carving guide lays out expert techniques for clean, precise results. Learn how to scoop and scrape walls to ideal thickness, transfer stencil patterns with pokers, and carve intricate designs using the right tools. Includes tips on knife control, creative scalloped edges, and carving multiple pumpkins as a family activity. Whether you’re aiming for spooky silhouettes or refined scenes, these time-tested strategies elevate your pumpkin from basic to professional. Ideal for anyone serious about improving their carving finesse.
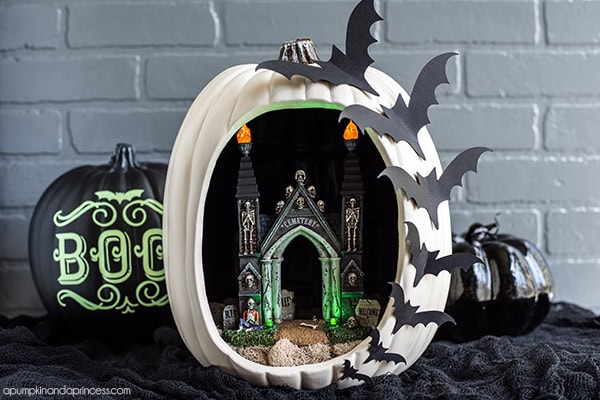
16. DIY Pumpkin Diorama
Transform a pumpkin into a tiny Halloween scene with this creative diorama tutorial. Carefully carve or use a pre-cut pumpkin, paint its interior black, and insert a Styrofoam base covered in moss. Top with miniature graveyard gates, skeletons, tombstones, and battery-operated lights for atmosphere. Paper bats flying around enhance the spooky vibe. Perfect for night-time ambiance, this diorama is customizable to fit your style: add haunted houses, candy corn trees, or ghostly visitors. It’s an artistic, kid-friendly project that transforms a simple pumpkin into a captivating mini Halloween world.
17. DIY Mini Playhouse Pumpkins
Create whimsical mini playhouses using faux or real pumpkins with this charming idea. Carve doorways, windows, and rooftops into pumpkins, then paint and accessorize to resemble fairytale homes or haunted cottages. Use contrasting colors to highlight architectural details, and install small battery-powered tealights to illuminate interiors. These mini playhouse pumpkins double as enchanting décor and imaginative toys: a delightful feature for porches, tables, or seasonal displays. The project is mid-level in skill, blending carving and painting to craft storybook-ready pumpkins that enchant both kids and adults alike.
18. Awesome Pumpkin Carving DIY
Bring humor to your pumpkin display with this playful “pumpkin eating pumpkin” concept. Carve a wide, fang-filled mouth on a large pumpkin, hollow it out, and place a smaller gourd inside to look like it’s being eaten. The expressive carving gives the large pumpkin personality, while the nested design adds visual impact. It’s a simple yet special idea that’s easy to execute and perfect for creating a spooky centerpiece. This dual-pumpkin trick is kid-friendly and ready-made for family laughs: ideal for porches, party tables, or as a fun Halloween centerpiece.
19. Polyhedral Pumpkins
Push pumpkin carving into the realm of design with this geometric polyhedral tutorial. By planning vertices and edges at symmetric points on the pumpkin surface, you can carve or etch shapes like dodecahedra or icosahedra. This sculptural approach transforms pumpkins into artful geometric forms. No hollowing needed, just precise cuts or chiseling. These modern, clean-line designs work beautifully with LED lighting that accentuates their angular planes. Though it requires patience and accuracy, the results are stunning: stylish, contemporary pumpkin art that doubles as a conversation piece.
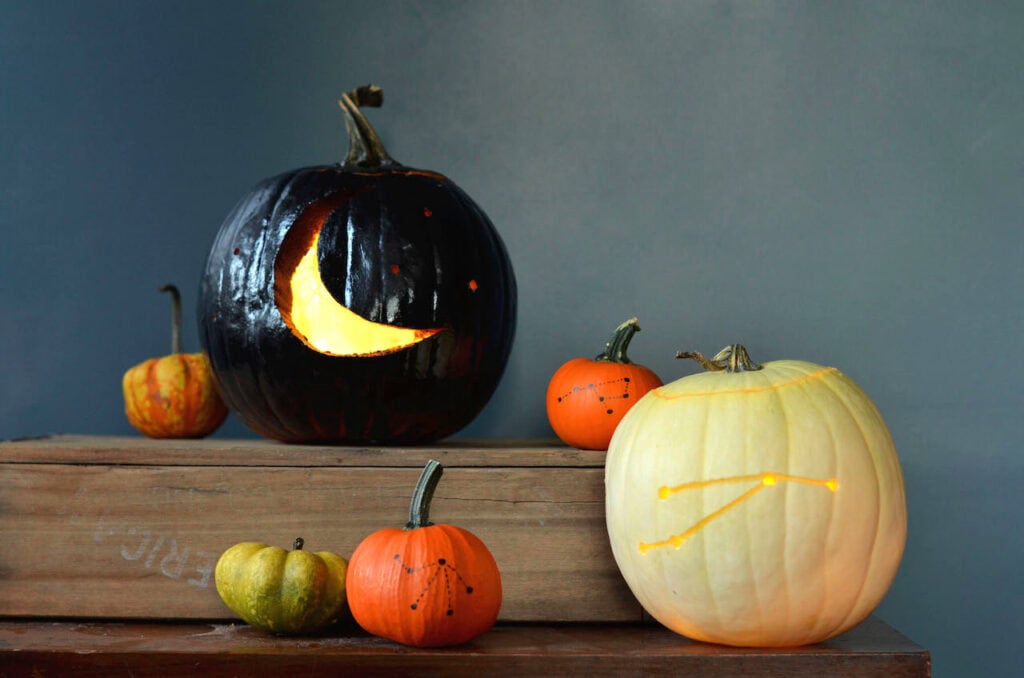
20. DIY Constellation Pumpkin
Celebrate the cosmos with a constellation-themed pumpkin. Use star and dot stencils to mark constellations like Orion or Cassiopeia onto the pumpkin surface. Use a drill or small carving tool to create perforations along the constellation lines so light dots through. You can also carve connecting lines for clarity. When lit, the pumpkin glows with starry night patterns, evoking a celestial feel. Repeat for multiple pumpkins to build a cosmic display. It’s an elegant, low-carve design that blends science and art, perfect for astronomy lovers and stylish Halloween décor.
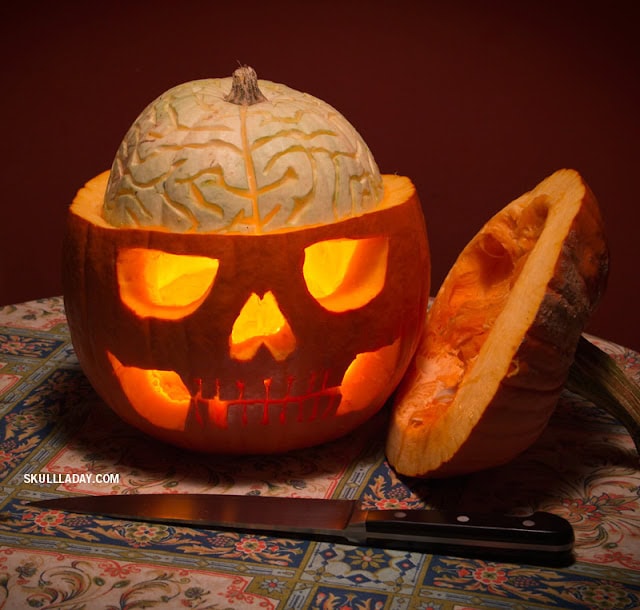
21. Pumpkin Skull and Brain
This morbidly fascinating pumpkin carving recreates life-like skull anatomy on your jack‑o’‑lantern. Carve away only the pumpkin’s outer rind at varying depths to expose light-holding flesh beneath: no full cuts required. Sculpt detailed bone structures such as cheekbones, nasal cavities, and teeth using clay-carving tools or scalpels. Light it from within, and the layered carvings glow eerily, revealing realistic skull dimensions. Ideal for intermediate to advanced carvers, this technique elevates your pumpkin to haunting artistry. The result is shockingly detailed and bone-chilling: perfect for horror fans and spooky home displays.
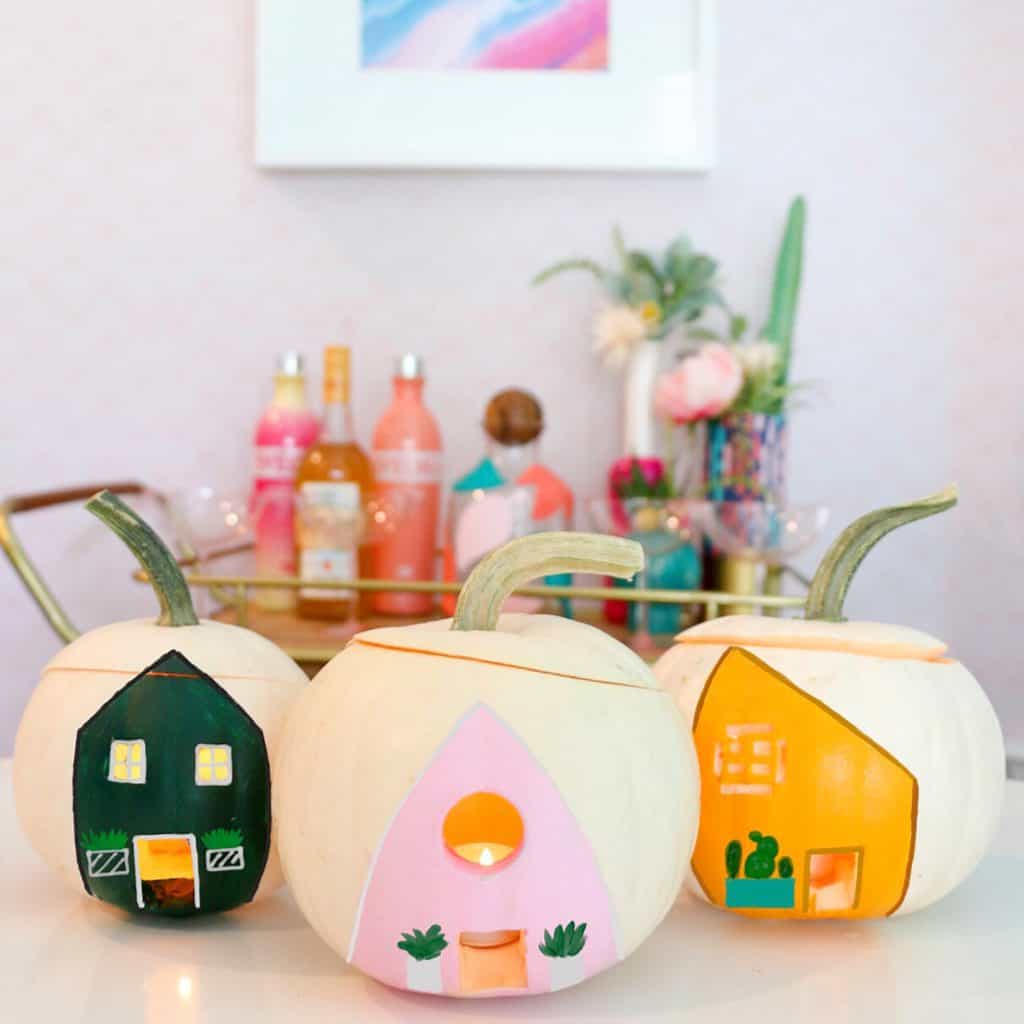
22. Pumpkin House
This playful DIY transforms a hollowed pumpkin into a cozy mini-home. Carve out doorways and windows, then place a small battery-powered tealight, tiny figurines, moss, and miniature furniture inside. Optional extras include twine lighting or fairy-garden accessories. The result? A whimsical illuminated pumpkin cottage is perfect for table centerpieces or seasonal kid crafts. This approachable, mid-level project blends carving and styling to create a storybook vignette. It brings warmth and imagination to your fall crafts and is a delightful activity to engage children in the magic of crafting.

23. Halloween Jack o’ Lantern
A classic, no-fail approach to pumpkin carving. This step-by-step method ensures a polished result, perfect for first-timers seeking traditional jack-o’-lantern flair without fuss.

24. Customizable Curved Pumpkin with Photo
This advanced technique shows how to carve a pumpkin using any photograph. Print a grayscale image and tape it onto a pumpkin. Use a poking tool to trace tonal values, then follow with sculpting tools: peeling layers to highlight midtones and deeper cutting for shadows. With this method, you can achieve photorealistic likenesses, ideal for portraits, pets, or movie characters. It requires patience and skill, but the payoff is stunning: a pumpkin that looks more like a carved sculpture than a traditional jack-o’-lantern.
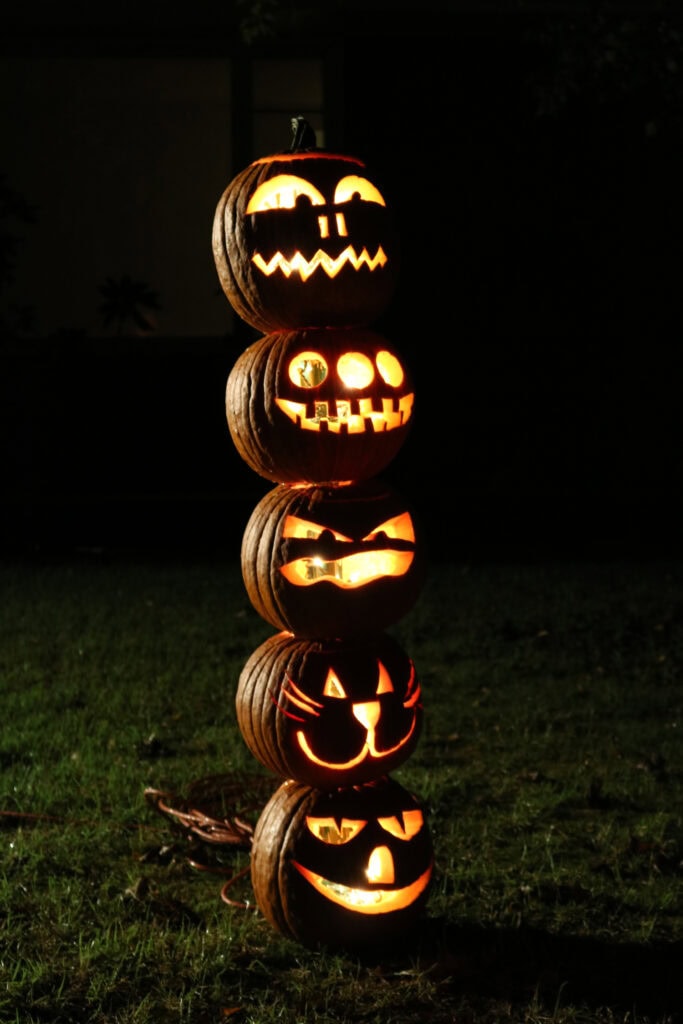
25. Halloween totem pole
Create a festive Halloween totem pole by stacking carved mini pumpkins on a sturdy stake or pole. With pumpkins of various sizes, carving coordinating faces, and alternately spacing them with foliage or floral bundles. Add lighting throughout the stack for an eye-catching column of glowing jack-o’-lanterns. This outdoor décor piece makes a dramatic porch or garden accent, combining the charm of mini pumpkins with the visual impact of a vertical display; ideal for both spooky and whimsical setups.
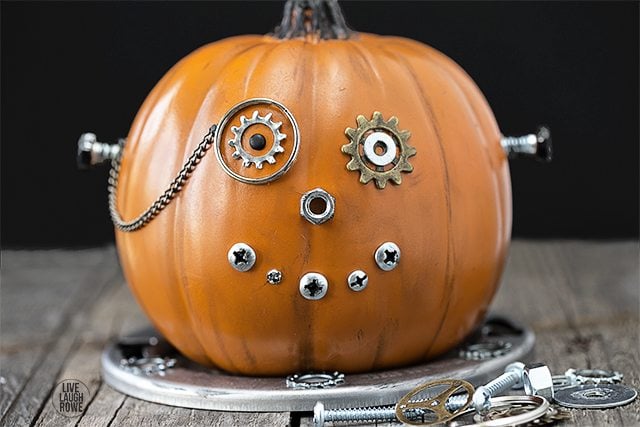
26. DIY Steampunk Pumpkin
Give your Halloween décor an industrial edge with this DIY steampunk pumpkin. No strict pattern necessary: just play with placement to create a whimsical mechanical vibe. The result is a memorable, conversation-starting piece perfect for porches or mantels. It’s artfully unconventional and fun for all skill levels, making it ideal for creative individuals or families looking to “think outside the gourd.
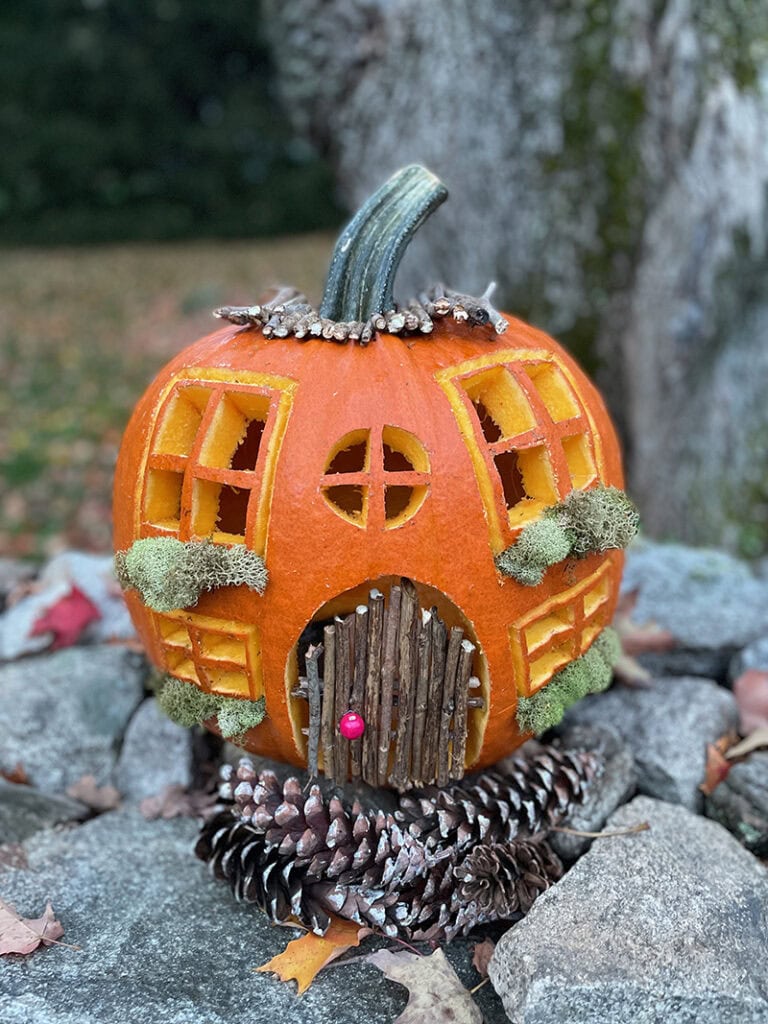
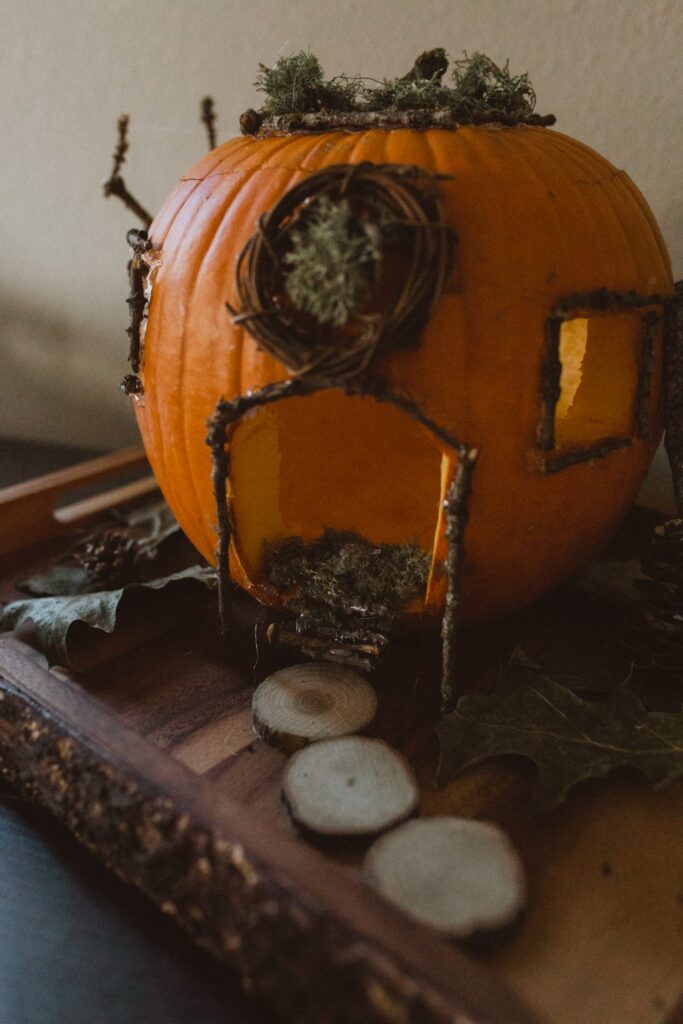
27. Pumpkin Cottage
Build a fairy-tale pumpkin cottage with this charming tutorial. Carve windows and a door into a pumpkin, then embellish with natural materials: a twig door, moss-lined windowsills, and a pinecone path. Add battery-powered tealights inside to make the tiny cottage glow warmly. It’s a mid-level craft ideal for both kids and adults who enjoy whimsical storytelling and nature-inspired design. Whether used as a table centerpiece, nightlight, or porch decoration, this sweet, illuminated pumpkin house brings cozy character and imaginative charm to your Halloween or fall display.